HP Pavilion 15-AB HDD~SSD jm 20160306
Key specifications
- Operating system: Windows 8.1
- Processor: AMD Quad-Core A10-8700P APU
- Display: 15.6-inch diagonal Full HD(33) WLED-backlit touchscreen display (1920×1080)
- Memory: 12GB DDR3L SDRAM (2 DIMM)
- Hard drive: 1TB 5400RPM hard drive
- Graphics: AMD Radeon™ R6 graphics with up to 4864MB total graphics memory
- Audio: B&O Play with dual speakers
- Battery life: Up to 6 hours and 45 minutes
- Optical drive: SuperMulti DVD burner
- Product weight: 4.91 lbs
- Keyboard: Full-size island-style backlit keyboard with numeric keypad
- Warranty: 2-Year limited hardware warranty
Working with the PC
- It does the job, software installation and setup w/o problems
- Windows HomeServer 2011 has problems with GPT (GUID Partition Table) disks
(addressed by applying the two Microsoft Hotfixes and then running Update) - I first upgraded the Windows 8.1 Home to the Windows 8.1 Pro edition
- Everything now ready to upgrade to Windows 10 Pro — what went very smoothly
- All applications (old and new) performing as expected
Preparing Migrating HDD to SSD
- Now: Toshiba HDD 1000 GB
- New: SanDisk SSD 960 GB
- Correct: the new drive is 40 GB smaller than the current drive
- Connect SSD to PC with SATA to USB interface; best: use external power supply
- Initialize new disk in Disk Management using (default) GPT
- CloneZilla does not support cloning to smaller drives
- AOMEI Backupper provides this, offers even HDD to SSD option
- Start Cloning HDD to SSD (preferred: reboot first, no other Apps open)
Getting ready to Replacing HDD to SSD
- Unfortunately, this HP Pavilion does not have “service doors” for disk or memory replacement
- The keyboard panel has to be lifted to access the disk compartment
- For that quite a handful screws need to be removed from the bottom
- You’ll need:
- Philips screw driver for small heads
- one-millimeter flathead screwdriver
- a sturdy plastic card
- Turn off the Notebook and disconnect external power supply
- Flip the Notebook upside down
- Remove battery pack, sliding the two locks to the inside
Removing the Screws
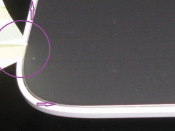
Location of Screws (visible and hidden)
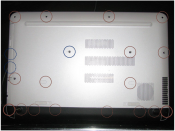
Most of the screws are black and of same length, except the one in the lower corners (bold circle) which have about twice the length.
Take battery out.
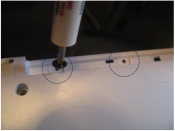
Remove the screw marked with blue cycle that arrests the DVD drive; then slide the drive out of its slot.
Remove the two tiny metal screws located inside the blue dotted circle:
Remove all screws; with small screwdriver cautiously lift the two hinge support covers (green circle) up:
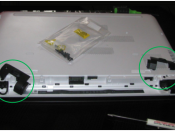
… and remove the screws that had been covered.
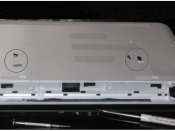
With a very small flathead screwdriver (1 mm) carefully remove the oval self-adhesive plastic strips, to then remove two screws underneath:
After all the screws have been safely removed and put aside, flip the notebook.
Cautiously open the lid.
Note: You may want to provide with your fingers support at the hinges.
Opening the notebook to access disk bay
Starting at the front edges carefully drive a plastic card under the front plate to release the various clamps along the sides.
Now carefully lift the plate at the front; the motherboard is attached to the keyboard.
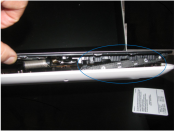
Cautious: You may notice that the HDD may slip out its bay.
Disconnect the SATA/power cable from the HDD, remove the brackets.

Put the brackets on the SSD.
Connect SATA/power cable and insert SSD in the drive bay:
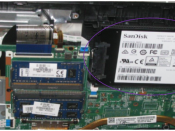
To the left you’ll see the two memory banks 8 GB (up to 4 GB shared with graphic card) + 4 GB.
Press front plate with back pane together, ensure all sides are securely clipped.
Close the lid.
Flip the notebook and insert all screws, hinge support cover, battery, etc. in reverse order.
Not to forget to insert the DVD drive and the (self-adhesive) plastic strips.
Now let’s put the migrated notebook to work.
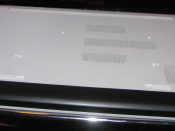
Power-up; F1 will display:

F2 shows system configuration:
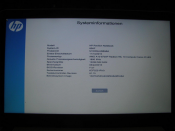
and the disk drive information:
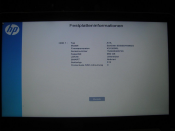
with the attributes of the new SSD.
Wrapping up
- Power-up
- Windows will eventually start; login
- Ensure all programs start and run as expected
- Go to Settings; search “Advanced System”; open “System Properties”
- System Properties:
Advanced — Performance — Settings - Performance Options:
Advanced — Virtual Memory — Change - Virtual Memory:
[checkbox] Automatically manage paging file size …
— OK
- System Properties:
- Go to Settings — Update & security; Windows Update
.